Starting Seeds Indoors: Nightshades

Every year we get to the first planting day of the season and I wonder where the time has gone.  Just a few years ago, around this same time, we were planting a hodgepodge of things in plastic cups for our tiny balcony garden.  Now we’re starting our second season at our farm property and we’re gearing up to grow many of our daughter’s first solid foods.  Time flies too fast, but it feels good to be so connected to the changing seasons.

tomatoes20161

If you had the chance to look at our small garden plans for this year, you’ll notice that almost everything can be directly sown in place.  The only exceptions are nightshade crops, like tomatoes and peppers.  In typical seasons we start spring brassicas (like broccoli and kale) indoors, but I’ll just be direct sowing them to save space inside.  We also usually grow eggplant, but because space is limited in the garden and we don’t get comparable yields we’ve decided to purchase these from other farms this year.  We’ll just be growing tomatoes, peppers, and tomatillos for transplanting.

My rule of thumb is to seed roughly an extra 33% of each transplanted.  For example, if I’m planning on planting tomatoes in the field, I’ll start by multiplying six by 1.33.  This equals 7.98, so I’ll seed eight paste tomatoes.  This accounts for any seeds that may not germinate and allows us to choose the best plants.  (I could sell the extra plants, but usually I just bring them to my parents for their “empty nester” garden.  It saves them some hassle, and they get a much wider variety than what they’d find at the nursery!)

So with that in mind, here’s what we’re sowing indoors today:

nightshade amounts.JPG

And I will also note that I usually grow in soil blocks, but because I’m seeding so few transplants I’ve decided to keep the equipment clean, save myself some time, and just grow in plug flats such as these.  I’m keeping the mix the same, which is based on Eliot Coleman’s soil block formula, as it has yielded strong results in the past:

  • 3 quarts compost (I use my father-in-law’s homemade vermicompost)
  • 3 quarts coconut coir
  • 1 quart vermiculite
  • 6 tbsp fertilizer (such as this blend)

I can’t wait to see those little sprouts over the next few weeks.  Hopefully it’ll hold me off until warmer spring weather arrives.

Happy planting!

Raised Bed Plans

Recently I wrote about my plans to utilize companion planting and vertical growing methods to maximize the space in our small garden this year.  I was asked to post my plans for these 4×8 wood-framed beds, so here they are!  These are packed tightly, as it’s an experiment to see just how intensively I can plant.  The books I used to come up with the spacing parameters can be found at the bottom of this post.

Note: “SP” stands for succession plantings.  Green lines indicate trellis.  Areas in red will be sown with my 4-row seeder.  Areas in yellow will be planted using homemade seed mats.  (Click here for more information on how I make hexagonal spaced seed mats for direct-seeded crops.)

Bed 1: 8 half-sheets of parsnip, two 8-foot hormanova trellises with 8 pruned indeterminate tomatoes each spaced at 12″, 4 sheets of SP lettuce, 4 sheets of SP chard, various herbs (will be purchased from the local nursery)

nightshade-1

Bed 2: two basketweave trellises with 6 plants each (6 determinate tomatoes, 2 determinate tomatoes + 4 tomatillo) spaced 18″, 8 pepper spaced 12″, 8 watermelon spaced 18″x24″Nightshade 2.jpg

Bed 3: 8 melons spaced 12″ along hormanova trellis, 31 cucumbers spaced 3″ along hormanova trellis, 12 summer squash spaced 18″, 6 okra spaced 18″ or 8 okra spaced 12″ (will be planted at 6″ and then I’ll decide when I thin them)

cucurbit-1

Bed 4: 12 winter squash spaced 18″x24″, two 8-foot hormanova trellises with 31 pole beans per side spaced 3″ (total: 124)

cucurbit-2

Bed 5: 8 kale spaced 12″ (spring/fall), 12 cabbage spaced 12″ (spring/fall), 8 half-sheets SP carrot, 8 half-sheets SP beet, 8 half-sheets SP radish, 4 whole + 4 half-sheets SP kohlrabi (spring: fresh, fall: storage)

brassica-1

Bed 6: 9 broccoli spaced 12″x18″, 9 cauliflower spaced 12″x18″, 6 Brussels sprouts spaced 12″x18″, 8-ft SP mesclun with 4-row seeder, 4 half-sheets beet (spring), 4 half-sheets carrot (spring), 4 half-sheets turnip (fall), 4 half-sheets rutabaga (fall)

brassica-2

Resources:

Winter Planning, pt. 3

Despite the snowy day on Sunday, it’s been unseasonably mild again this week.  In fact, it was 56 degrees out when I was feeding the baby at 2:00 this morning!  That’s unbelievable for the first day of March, especially when it’s dark out.

Anyway, the good thing about the mild weather is that it gives me a chance to step out for some fresh air with the baby during the day.  I’ve been keeping an eye out for the first signs of rhubarb so we can locate the crowns and divide them.  I hoped to get to it this year but with the order of fruit trees coming in two weeks and my husband in the heat of school musical season I’m thinking we’ll have to push it off until 2018.  But in the meantime we can work on clearing the wild grape and blackberry from the area so that it’ll at least be easier to access the rhubarb for this year’s harvest.

As a side note, I’m off my game lately.  I’ve got a baby here who’s going through a growth spurt.  Phew!  We are all extremely tired.  I feel like I’ve got a newborn again – we went from a six-hour stretch of sleep (and for almost a week, an eight-hour stretch!!) to getting up every 2 hours all night long.  Luckily she’s still taking naps during the day, so although I’m trying to spend at least one of them catching up on my sleep I’m also able to continue plugging along with our garden plans.  Let me catch you up on that.

In order to maximize the square footage of our raised bed garden, we will be growing vertically and companion planting.  I first compared online and text resources to figure out crops that grow well together, then made pairings that (1) combined one crop that can be trellised with another that can stay low to the ground and (2) would not repeat a crop family two years in a row (i.e. no nightshades following nightshades).  So from all of that reading I’ve come up with long term plans that we will utilize as we expand the garden as well as a modified plan for this year’s mini-garden.  I hope this may be useful for other growers who are trying to maximize their space!

Now that I’ve got this figured out, I’ll soon be posting the sketches for our 4×8 beds.  Stay tuned!

2017 Companion Planting Plan:

  • Bed 1: indeterminate tomatoes (string trellis), lettuce, chard, bush beans, dill, parsley, basil
  • Bed 2: determinate tomatoes, tomatillo, pepper, watermelon
  • Bed 3: cucumber (hormanova trellis), melons (hormanova trellis), summer squash (bush), okra
  • Bed 4: winter squash, pole beans (hormanova trellis)
  • Bed 5: kale, cabbage, kohlrabi, carrot, beet, spinach, radish
  • Bed 6: broccoli, cauliflower, Brussels, mesclun, carrots and beets (spring) –> turnips and rutabaga (fall)

Long Term Companion Planting Guide:

  • indeterminate tomatoes (string trellis) –> basil, parsley, dill
  • determinate tomatoes (basketweave trellis) –> winter squash
  • tomatillo and ground cherry –> watermelon
  • pepper –> calendula
  • eggplant –> nasturtium (hormanova trellis)
  • broccoli –> beet (succession)
  • Brussels sprouts –> lettuce
  • cauliflower –> carrot (succession)
  • collards –> mesclun mix (succession)
  • cabbage –> carrot (succession)
  • kale –> spinach (succession)
  • melon (hormanova trellis) –> bush beans (succession)
  • summer squash (bush) –> pole beans (string trellis)
  • cucumber (hormanova trellis) –> mesclun (succession)
  • winter squash –> pole beans (string trellis)
  • watermelon –> pole beans (string trellis)

References:

http://www.mysquarefootgarden.net/companion-planting/

http://permaculturenews.org/2011/12/02/companion-planting-information-and-chart/

http://www.motherearthnews.com/organic-gardening/companion-planting-guide-zmaz81mjzraw

https://www.humeseeds.com/comp1.htm

http://www.ufseeds.com/Vegetable-Companion-Planting-Chart.html

Winter Planning, pt. 2 + FREE PRINTABLE!

This year, my family is scaling back our growing space to 4×8 raised beds instead of traditional rows.  Over the coming weeks I will be writing about the biointensive planting, intercropping, and vertical growing methods that we will use as well as sharing my plans and materials.

My husband picks on me because I read seed catalogs ad nauseam, over and over even though my seeds were selected and ordered a while ago.  When everything is covered in snow I can’t help but drool over the photos of fresh produce!

I noticed that Johnny’s sells seed disks for herbs.  The seeds are already spaced for you on paper, which you then simply pop into a pot, cover to the proper planting depth, and water.  In my time gardening I haven’t had much success with herb growing from seed besides parsley, basil, and dill, and that’s why these initially caught my attention.  As I’ve continued to finalize the layout for this year’s garden, I had the idea that maybe there were similar products for vegetable crops that get directly sown – carrots, radishes, etc.  I have a 4-row seeder that I like for the ease of planting and spacing rows, especially for baby green mixes, but I still have to get down on my hands and knees when it’s time to thin the root crops (and besides, I hate feeling like I’ve wasted perfectly good seedlings during the thinning process).  All I could find was seed tape, but this wasn’t what I had in mind.

I know you can make your own seed tape by putting dots of flour-water paste or water-soluble glue at the appropriate spacing intervals across a length of toilet paper, then placing seeds in each dot of paste.  However, what I envisioned was a sheet with seeds spaced out in a hexagonal pattern, which is our preferred spacing method for root and greens. I first read about this technique in Sustainable Market Farming: Intensive Vegetable Farming on a Few Acres by Pam Dawling.  In this method, plants are staggered in a way that, unlike a grid, allows each plant to have equal access to sunlight while also using space more efficiently than traditional rows.  A quick Google search showed that other gardeners have had similar seed mat ideas before, but I couldn’t find any templates.

seed-mat.jpeg
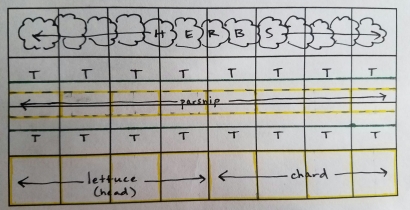
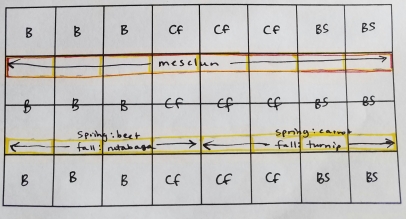
Based on common biointensive spacing recommendations I’ve made some hexagonal pattern templates.  Using unfolded paper napkins or paper towels, which are just about a square foot in size, put dots of the paste or glue in the appropriate spots and then place your seeds.  You’ll still have to thin your beets, but that’s a lot less work than thinning all of your roots and greens!  I’m thinking this will make our succession planting pretty easy when the time comes, as I’ll just have to place another napkin down, cover as needed with compost, and move on.

Feel free to use these templates for your garden plan.  Let me know if you have experience making or using seed mats or if you plan to give them a try this year!

Click Here to Download Free Seed Mat Templates!

Bedtime Thoughts

I set a goal for myself to at least write every Thursday and Sunday so I thought I’d squeeze in a few words before I go to bed.

Now that the baby is out of the newborn stage her routine is becoming more predictable (strong emphasis on the word “becoming”!). Most nights she gets up only once to eat and most days she has a relatively consistent routine. Her first nap is the longest and typically gives me enough time to squeeze in some exercise and a bit of farm work, and her shorter naps can be used for tidying up around the house and cooking dinner.  I’ve heard I should nap along with her but I am not good at sitting still!

One of the hardest things for me about breastfeeding and caring for a newborn without local family (especially while recovering from a cesarean) has been the changes in my body.  As someone who does most of the work on her farm by hand, the loss of strength and mobility is a scary thing and a major setback.  It will be a long time before I can do as much as I used to.  And as such, my plans need to be tweaked accordingly.

After doing a lot of reading this week I’ve decided that we are going to grow in nine 4×8 raised beds this year.  By the square foot, it’s a much smaller garden than I’m used to but it will be smart to scale back this year. That being said, I’m using this as an opportunity to better develop our biointensive practices as well as incorporate vertical growing and intercropping techniques.

More words on this later on.  Sweet dreams!

Winter Planning, pt. 1

020417.jpg
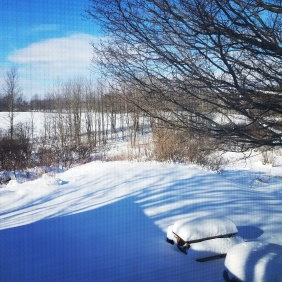
Good morning!  How great is it to wake up to sunshine and blue skies?  Winters here are mostly grey (plus we’re in zone 5 and it’s super cold), so this weather makes for an instant good mood.  We won’t be straying far from the house today but it’ll give us the chance to catch up on some chores and cooking.  And I’m trying to buckle down on plans for this year’s vegetable garden.

The problem is that I can’t plan this year’s planting schedule until I know exactly how much space I’ll have to work with.  I know I need something realistic for having a little one attached to my hip yet also helpful for future garden expansions.  We joke that last year’s garden was a food-forest, but really it was just a plot of crops overtaken by invasive weeds.  I bit off more than I could chew.  It was hard to keep the land cleared adequately in the heat of summer while pregnant.

I’ve been planning to eventually have eight 4×8 wood-framed beds of perennials (asparagus, sunchokes, herbs, horseradish) plus seventeen 30-inch x 40-foot beds with 12-inch paths in between.  Lately I’ve been toying with the idea of building the 4×8 beds and using them for this year’s annuals.  When I asked my husband’s opinion he was on board but also posed maybe sticking to the wood-framed beds in the future, expanding with a new line of them every year until the plot’s as big as we want.  I do love how tidy they look.  We have lots of friends and family who swear by them, and it would make bed prep manageable, but I’m unsure how I feel.  I’d probably end up with more than 40 of them, and I hate the idea of not using our beautiful native soil.  Maybe they can be shallow enough where the plants’ roots will still be able to access the soil.  I’ve got some research to do.  I guess if he wants to build more of them every year I can just sit back and enjoy, can’t I?  (Ha!)

Regardless, I’ll stick to the eight future-perennial beds (maybe plus some extra space) for this year’s garden.  Now I can get to work on sketching out the beds and figuring out how many plants I’ll need to start.