Perspectives from a Swiss Farm Stay Guest (+ Plum Jam Recipe!)

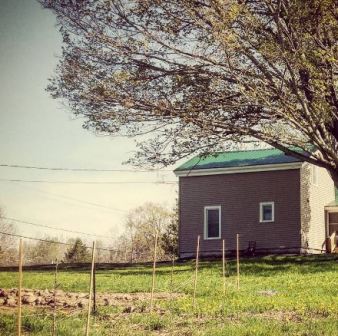
Since we are a working farm, our farm stay usually requires three days of advance notice.  However, we received an inquiry on the 23rd from a middle-aged woman from Switzerland named Sabine who is traveling the United States indefinitely and was looking for a place to stay overnight on the 24th en route to Vermont.  Our company had just left and I had already refreshed so it was easy to say yes to her inquiry.

To say I’m glad I did is an understatement!  It was an amazing experience to host someone from Europe who specifically chose to stay with us to see what family farms look like in America.  I gave her a tour of our farm and shortly after she asked if she could extend her stay from one night to two.  She was great company so I accepted.  She was having a very restful time and then extended to a third night, and ths gave us a lot of time to talk about so many topics related to the U.S. in general as well as agriculture (sustainable and otherwise).  Sabine was a retired political journalist and was journaling about the people she met and the topics that mattered to them.

A few things I found interesting and that other small farmers and homesteaders may find very interesting:

  1. I have never been to Europe, but Sabine shared that many people have a kitchen garden and know how to preserve their food whether by storing them in glass jars or by dehydrating.  Sabine’s mother taught her to preserve without the use of refrigeration (I’m thinking of you, all of my dear off-grid homesteaders).  Sabine and her late husband had a home in the Piedmont region of Italy, including a vast amount of grapes, plums, and tomatoes.  She would jar enough tomato sugo to last her and her extended family for the year or longer.  She would make marmalade from any fruits she harvested from her property.  She would also dry many fruits.
  2. The United States is over-regulated (and IMHO on the wrong things).  Specifically, I mean in regards to what we can and cannot sell from our farms.  We made plum preserves together and she asked to purchase some when she left.  She was flabbergasted to hear that while I would love to share it with her as a gift, I was not legally allowed to let her purchase the jam because in New York State there are strict regulations on home-canned goods.  When she asked about purchasing dried tomatoes and apples, she was equally bothered that it was illegal for me to sell any produce that had already been cut or portioned.  I would need to rent a certified, commercial kitchen in order to do this.  She continually commented on how sanitary and professional my canning methods were and how she just didn’t understand why individuals can’t make decisions for themselves about whether or not they trust home-canned or home-dehydrated goods.
  3. People in Europe value farm-fresh goods more than Americans.  (Are you surprised to hear this?  I really wasn’t.)  Most things are purchased through direct marketing from specialists.  Local food is the norm for many people.  For example, your vegetables and fruits come from a farmer, as do many preserves and pickles of any kind (unless you make them yourself).  Meat comes from farmers and butchers.  Fresh bread comes from bakers, many of whom use traditional sourdough methods.  Sabine asked to purchase a half-dozen of eggs and when I charged her $1 she felt like I was selling myself short.  In Switzerland, it is common to pay $3.50 for a half dozen of pastured eggs from a farmer.  I typically charge $3.00 for a full dozen!  I said that I would never be able to sell my eggs for $7/dozen here, and she said that people don’t even think twice where she comes from because they know there is a staggering difference in quality and flavor, not to mention that they value their local economies over large enterprises.

Lastly, she reminded me that our farm is a business and that while it is important to have a giving spirit I won’t have a successful business if I don’t charge what my products deserve.  It can feel uncomfortable to take money from friends and family, but as small farmers, let’s all agree that we are going to stand by what our goods are worth.

Our Fall Egg CSA starts in a week, and I’m so excited and proud that I get to make my living this way.  You should be, too.  Let’s try to work some of that European local food appreciation into our culture!

P.S. Here is my recipe my recipe for jam with any stone fruit (apricots, peaches, plums, apricots, cherries, or a mix).  My very favorite, which I made with Sabine, is made with Italian prune plums that I picked at a nearby orchard.  Use freestone fruits whenever they are available because it greatly reduces prep time!

plum jam

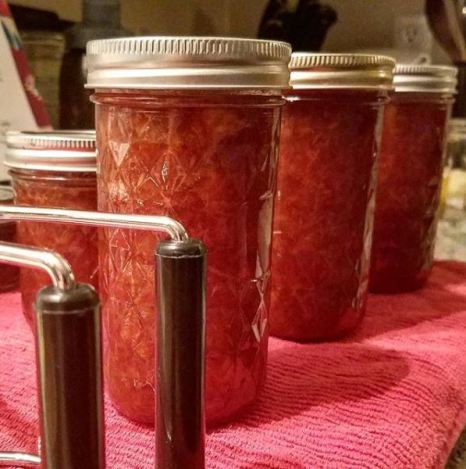
Stone Fruit Preserves (Water Bath Canning Recipe)
About 4 lb whole stone fruit
1/2 c water, reserved from boiling the fruit
Juice of 1 lemon
4 tbsp no sugar pectin
4 1/4 + 1/4 c sugar, separated
1 tsp butter

Begin by bringing a small pot of water to a boil.  Meanwhile, wash the fruit and then use a paring knife to cut a small “x” into the blossom end of each fruit.  When the water has come to a boil, carefully lower the fruit into the pot (in batches, depending on the size of your pot) and boil for one one minute.  Cool the fruit until you can touch it.

While the fruit is cooling, combine the 1/2 cup of reserved cooking water with the juice of one lemon.  In a medium bowl, measure out the 4 1/4 cups of sugar.  In a small bowl, combine the additional 1/4 cup of sugar with the 4 tbsp (1/4 cup) of pectin.  Combining a small amount of sugar with the pectin helps to prevent the pectin from clumping. Finally, measure an approximate tsp of butter and set aside.  This small amount of butter will reduce foam.

Prepare the fruit by peeling, removing stones, and chopping to about 1/2″ square in size.  Place the prepared fruit into a heavy bottomed vessel at least 5 quarts in size, such as an enameled cast iron dutch oven.  Coat with the water and lemon juice.  Bring to a boil, reduce to a simmer, and cook with the lid slightly ajar for about 10 minutes or until the fruit is completely cooked.  You may choose to use an immersion blender for very smooth preserves (this will make more foam that you should skim off), but I prefer to simply mash the cooked fruit with a potato masher to leave some small chunks.  One the mixture is at your preferred consistency, stir in the 4 1/4 cups of sugar and the butter.  Bring to a boil, stirring constantly.  Once it reaches a boil, stir in the sugar/pectin mixture and cook for about one minute or until the jam sets at the desired thickness.  Overcooking the pectin can prevent your jam from setting, so I check the thickness by placing a spoonful on a bowl of ice in the refrigerator.  This will show you how thick the preserves will be when completely cooled.

Remove from the heat and pour into sterilized jars, leaving 1/4-1/2″ of head space. (See this website on how to sterilize jars.)  I then use a clean butter knife and stir the jam to remove some air, wipe the rim, place a hot lid, and twist a band to finger-tightness; this is how my mother taught me, but I’m sure there are other methods out there.  Process in a hot water bath: 5 minutes for half- and quarter-pints, 10 minutes for 12-ounce jelly jars and pints.  Remove from the water and cool for 12-24 hours before checking if the jars have sealed.  I like to use the smaller, freezer-safe jars so that any that don’t seal can be popped in the deep freezer in our basement.  I tend to use those jars first to clear that precious freezer space.


Hello, Old Friend.

Okay, I haven’t written in…a year and four months.  Things have been busy with baby girl and the farm, both of them always growing and teaching me new things.  But here I am!  I’m back and I’m going to try to be better about updating this.  We have a blog on our farm’s website but I try to use that more for farm business updates (i.e. recipe ideas for CSA members) rather than my rambling thoughts, farm planning resources, etc.

I thought I’d update this website with some things that have changed since last April.

First of all, our baby girl is going to be two in November!  Where did the time go?  That child certainly keeps me on my toes.  She loves to be outside, especially with her chickens.  Flowers have been one of her favorite things for a long time now, and she loves to smell and pick them.

Last season was a learning experience (what moment isn’t a learning experience on a farm?) with lots of experimenting.  A few major notes:

  • I’ve found that the 30″ rows with 12″ paths has been my preferred system.  I’ve also finally found the right balance of intensive spacing that maximizes my space without sacrificing our yields.  This is intensive enough that we need to build our own harvest cart but we’ve found we still have more than enough space to move out there.
  • We have finalized plans for “Phase 1” for annual vegetable production, which will include seven rotating plots of six 50-foot rows each.
  • Landscape fabric is absolutely essential to our farm’s operation.
  • We’ve picked up way more work with cut flowers in 2018, including our first ever wedding in September, and while this will require us to set up a tax ID we’ve found that there is a lot of financial gain to be had in this area.  We’ve worked some annual flowers into our long term crop rotation plan.
  • I’ve felt comfortable with the actual planning and growing component of farming because of the foundation I was given by my parents, but I’ve spent the past year educating myself on the business end and I have so many things that I want to share on here for new farmers who are ready to start their own operation.
  • We’re learning to embrace our land for what it is, even if it doesn’t have room for acres and acres of annual veggies.  We had a forest stewardship consultation with a county representative from the NYS Department of Environmental Conservation that I can’t wait to tell you all about soon.
  • The orchard has changed a bit.  The original nine – 3 cherry and 6 apple – are doing really well.  The peach and plum from last year didn’t take but we replaced them with two hazelnuts.  We were gifted a graft from an apple tree from a new friend, a second-career farmer who is converting much of the local farmland to organic certified land for biodiverse grain production, that had been started from seed over 50 years ago by the original farmer on his property about a mile from our home.  For my birthday this year, my best friend and her husband gave me a winesap apple tree as well.  We also put in two pear trees and two chestnuts.  Next year, we will be “finishing” (at least finishing this current section of orchard) with two nectarines and an Asian pear.  Another major and exciting note: one of the Cox’s Orange Pippins has our first ever actual apple!  We’re so thrilled.
  • The berry patch has been a major project for 2018.  The three honeyberries from last year are in incredible shape and we are expecting our first fruits next May.  We added two figs (only one has survived), twenty blueberries, and ten elderberries this past spring.  Yesterday, my best friend visited with her husband and mother-in-law.  Her mother-in-law works at a vineyard that grows grapes and berries for resale, and I was surprised and delighted that she brought us five red currants, two aronias, and two more blueberries.  This was an unbelievable gift that I am still stunned by!  Next year, we will add raspberries, blackberries, and five more currants, and I’ll also divide the existing rhubarb to make at least 24 separate plants.  By the time we are done we hope to also include serviceberries, lingonberries, beach plums, and seaberries.
  • We now host farm stay guests, which has given me an opportunity to fulfill my interest in educating people about our traditional lifestyle and seasonal, nutritious eating.

I think that’s a fair update for now.  But I’m really feeling excited to share more detailed updates with you soon.

Good night!

Homestead Updates

1. The month of musicals has finally come to a close and I have my husband back. Phew!  He has had a hard time with his career this month, as he often left just as the baby was getting up to eat and got home after she was put to bed at night.  I waited up for him if he was able to get home before 10:00, and although it’s been tiring I’m glad that I did.  Being a stay-at-home parent to a young baby can be isolating, and if not for our quick chats over a glass of wine each night I’m sure I would have felt more lonely.

He has missed out on so many baby milestones and doesn’t even feel fulfilled by the work he is doing, so the long hours in a suit and tie don’t seem worth it to him anymore. I know plenty of people who think we’re crazy for it but we would do anything to work side by side each day!  It motivates me to work more diligently on our farm.  Maybe someday we can grow our operation enough so he can join in full time.

2. I made a giant batch of pastured pork trotter stock. This stuff is liquid gold!  It is so gelatinous. Maybe that’s not an appetizing word, but it’s the right one. It is so rich, buttery, and satisfying. Tonight for dinner I used it as a base for one of our family favorite meals, build-your-own noodle bowls.  I also froze five more quarts.  We’ve got happy, warm bellies.


3. I got a head start on our stash of baby food since that adventure will be happening in a month or so.  Right now I have apple, Asian pear, sweet potato, parsnip, and carrot, all of which were storage crops purchased in bulk from local farmers.  (Did you know that you can’t give home-canned fruits and vegetables to babies?  I am so thankful for our year-round market so we have access to these products even in the cold months!)  I froze them in ice cube trays, then transferred them to freezer bags.  Each cube is roughly one tablespoon in size.  I can easily use them in soups and smoothies, too!

IMG_20170327_080759_1634. Good stuff going on with the nightshades we started a week ago.  So far almost all of the tomatoes have germinated, but we are still waiting on peppers, tomatillos, and eggp
lant. I started more than I originally planned so I can have more seedlings to share with my parents.  Later this week I will share more specific germination notes.

5. The fruit trees have been pruned, and now we are just waiting on the four new additions. They were originally scheduled to arrive yesterday but sudden below-freezing temperatures (14°F) delayed them. Right now it’s looking like April 1st is the day.

A busy weekend but a good one nonetheless.  I hope everyone’s week is off to a great start!

Baby Humans and Baby Chickens

Today, my husband went out to run errands before his show this afternoon.  He told me he was going to swing into Tractor Supply Company to see what chicks they had this weekend.  Last weekend, they had unsexed assorted Bantams and Leghorns.  But this time they had unsexed Rhode Island Reds and ISA Brown pullets.  So after some reading, despite having my heart set on the Australorps, I decided to go with the ISA Browns because their description fit the bill and we don’t want males.  My husband came home with six of these little cutie pies.  I think they’re adjusting to their brooder box well.  Thanks to The Cape Coop for these DIY brooder box plans!

ISA Brown chickens are a hybrid, bred to be extremely productive layers of large brown eggs.  I’m certain that we’ll get our Australorps eventually, but these seem like good first backyard chickens.  They’re apparently very quiet, docile, and friendly, plus they lay eggs sooner than other breeds.  Or so I read!  Time will tell.

Now, when I first wrote that I thought I was up to the task of raising baby chicks for the first time, my baby was being a rock star sleeper.  She had just wrapped up a growth spurt and was back to a few long naps and was sleeping 9-9.5 hours straight during the night (and yes, I did have a glass of red wine after I was certain she had fallen asleep!).  However, last night was atrocious, and today hasn’t been much better.  Hey, I have off days, too!  I figured if things were going so beautifully sleep-wise I was owed a curveball.  My sister said there is a 4 month sleep regression.  Is that a thing?  Anyway, now my husband has set up a space for these precious little creatures and I’m sitting here typing this and hoping I didn’t bite off more than I can chew.

“Every day is a new day.”  That’s my new motto.

Winter Planning, pt. 2 + FREE PRINTABLE!

This year, my family is scaling back our growing space to 4×8 raised beds instead of traditional rows.  Over the coming weeks I will be writing about the biointensive planting, intercropping, and vertical growing methods that we will use as well as sharing my plans and materials.

My husband picks on me because I read seed catalogs ad nauseam, over and over even though my seeds were selected and ordered a while ago.  When everything is covered in snow I can’t help but drool over the photos of fresh produce!

I noticed that Johnny’s sells seed disks for herbs.  The seeds are already spaced for you on paper, which you then simply pop into a pot, cover to the proper planting depth, and water.  In my time gardening I haven’t had much success with herb growing from seed besides parsley, basil, and dill, and that’s why these initially caught my attention.  As I’ve continued to finalize the layout for this year’s garden, I had the idea that maybe there were similar products for vegetable crops that get directly sown – carrots, radishes, etc.  I have a 4-row seeder that I like for the ease of planting and spacing rows, especially for baby green mixes, but I still have to get down on my hands and knees when it’s time to thin the root crops (and besides, I hate feeling like I’ve wasted perfectly good seedlings during the thinning process).  All I could find was seed tape, but this wasn’t what I had in mind.

I know you can make your own seed tape by putting dots of flour-water paste or water-soluble glue at the appropriate spacing intervals across a length of toilet paper, then placing seeds in each dot of paste.  However, what I envisioned was a sheet with seeds spaced out in a hexagonal pattern, which is our preferred spacing method for root and greens. I first read about this technique in Sustainable Market Farming: Intensive Vegetable Farming on a Few Acres by Pam Dawling.  In this method, plants are staggered in a way that, unlike a grid, allows each plant to have equal access to sunlight while also using space more efficiently than traditional rows.  A quick Google search showed that other gardeners have had similar seed mat ideas before, but I couldn’t find any templates.

seed-mat.jpegBased on common biointensive spacing recommendations I’ve made some hexagonal pattern templates.  Using unfolded paper napkins or paper towels, which are just about a square foot in size, put dots of the paste or glue in the appropriate spots and then place your seeds.  You’ll still have to thin your beets, but that’s a lot less work than thinning all of your roots and greens!  I’m thinking this will make our succession planting pretty easy when the time comes, as I’ll just have to place another napkin down, cover as needed with compost, and move on.

Feel free to use these templates for your garden plan.  Let me know if you have experience making or using seed mats or if you plan to give them a try this year!

Click Here to Download Free Seed Mat Templates!

Winter Planning, pt. 1

020417.jpg
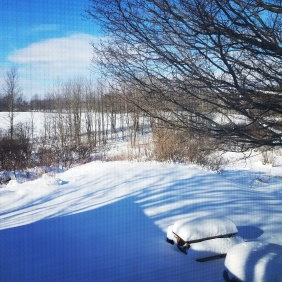
Good morning!  How great is it to wake up to sunshine and blue skies?  Winters here are mostly grey (plus we’re in zone 5 and it’s super cold), so this weather makes for an instant good mood.  We won’t be straying far from the house today but it’ll give us the chance to catch up on some chores and cooking.  And I’m trying to buckle down on plans for this year’s vegetable garden.

The problem is that I can’t plan this year’s planting schedule until I know exactly how much space I’ll have to work with.  I know I need something realistic for having a little one attached to my hip yet also helpful for future garden expansions.  We joke that last year’s garden was a food-forest, but really it was just a plot of crops overtaken by invasive weeds.  I bit off more than I could chew.  It was hard to keep the land cleared adequately in the heat of summer while pregnant.

I’ve been planning to eventually have eight 4×8 wood-framed beds of perennials (asparagus, sunchokes, herbs, horseradish) plus seventeen 30-inch x 40-foot beds with 12-inch paths in between.  Lately I’ve been toying with the idea of building the 4×8 beds and using them for this year’s annuals.  When I asked my husband’s opinion he was on board but also posed maybe sticking to the wood-framed beds in the future, expanding with a new line of them every year until the plot’s as big as we want.  I do love how tidy they look.  We have lots of friends and family who swear by them, and it would make bed prep manageable, but I’m unsure how I feel.  I’d probably end up with more than 40 of them, and I hate the idea of not using our beautiful native soil.  Maybe they can be shallow enough where the plants’ roots will still be able to access the soil.  I’ve got some research to do.  I guess if he wants to build more of them every year I can just sit back and enjoy, can’t I?  (Ha!)

Regardless, I’ll stick to the eight future-perennial beds (maybe plus some extra space) for this year’s garden.  Now I can get to work on sketching out the beds and figuring out how many plants I’ll need to start.

A Call to Farm

A year and a half ago, my husband and I decided we were ready to take the plunge and leave apartment life in the city.  He was ready to be a homeowner and have more privacy.  But for me, it was more about the land.  I missed the big yard, fruit trees, and garden that I grew up with in Pennsylvania.  I missed seeing the journey of food from planting to harvest to preservation.  I missed getting my paws dirty and performing work with tangible outcomes.

It had been about a year at that point since I had come to the realization that I wanted to get involved in the food system.  As a teacher in an urban school I began to see huge differences in attention, focus, and even academic achievement between my students who ate primarily natural foods and my students who ate primarily processed foods.  Lots of my kids, believe it or not, truly had no idea at all where their food came from, and some had never even had a home-cooked meal before.  I love teaching, but I felt like I had to switch gears and find a way to teach both children and adults about the importance of good food.farmhouse-from-orchard

We lucked out when we found our home – a small but recently renovated 1860s farmhouse on about six acres of land, including a few acres of woods, a creek, and lots of big old trees, perennial flowers, and rhubarb.  When we moved in that winter, we immediately got to work on turning the land into a homestead.  We added nine fruit trees and a large bed of strawberries, and we had ambitious plans for a 3,000 square foot vegetable garden…

…until during our first spring in our home we found out that we were going to have our first baby.  What a wake up call this was for me!  I am a dreamer, and this was a much needed reason for me to reel in my plans for that first year (and the years to come).  I decided to sit down and write down some big questions.  Why did I want to farm in the first place?  What were my goals for the property?  How was I going to use farming to support my family?  When did I hope to get my operation running?  How would I balance my role as a mother with my role as a farmer?

So here we are in the dead of winter, new baby in tow as we get ready for our second season.  My husband has encouraged me to write about life on our homestead, including parenting, natural living, and farming on a small scale.  I hope sharing this journey will allow me to find some sort of balance between all of these things.

How do you balance your role as a parent with your own aspirations?  Let me know!