Business Planning for New Farmers, Part 1: The Whole Farm Planning Model

While I didn’t find this idea until after I had created my formal business plan for our farm, I wish I had found it sooner!  This planning method comes to us from Ohio State University’s Extension program.  Although I will touch on the more business- and finance-driven aspects of a tradition business plan in my next post in this series, the parts I want to highlight are a bit more narrative.  Simply open up a new Word doc and get your thoughts in writing.

Family & Farm History: Write about your property: location, soil type, the house itself, what exists already (buildings? plants?), and land features, how long you’ve had it, what you’ve done to the land already, what you still aspire to do with the land.  If you don’t yet have a property, you can still write about your aspirations and what you’ll specifically look for in a parcel of land.  Talk about your family.  How old were you when you bought it?  How old are you now?  What are you doing for income at the moment?  Children?  Animals?  (Note: I was able to write about a page about this information initially, and I’ve added a few sentences every few months with updates i.e. orchard expansion, mushrooms in the forest, etc.)

Current Farm Status: What are you doing now to work towards your goals?  Are you generating any income from your farm?  Are you planning anything for the near future?  Are you incorporated yet?

Current Family Status: What does your family look like?  Who does what task?  What are the challenges related to your family structure/task distribution?

Individual Assessment: Reflect on your abilities as well as the areas you feel you could improve.  Communication skills?  Financial skills?  Production skills?  Management skills?  In what area are you strongest?  Weakest?

Personal Goals: What are your goals for your personal life, including health, personal finances, ?  These don’t have to be specific to agriculture.  For example, maybe your biggest financial goal is to pay off your student loan debt.  Maybe you want your farming business to be able to replace your current job (and maybe your spouse’s, too).  Maybe you want to get healthier and make an honest living doing it.

Family Goals: What are your goals for your family?  Do you plan to have children (or more children)?  What kind of lifestyle do you want for your family?  Do you want to homeschool or send your children to public school?

Business Goals: What are your goals for your business?  Do you want it to be a part-time income during the summer months?  Are you looking to make a full-time ($50K+) income?  Is there a specific venture you want to be the main part of your operation?

Retirement Plan: When do you want to retire?  What will you do after you retire?  How much income will you need?  Do you have any retirement income sources planned yet?

Before you make your formal business plan, take the time to complete these writing exercises.  You won’t need to have your math figured out yet, but the ideas that come to you as you write may inform the decisions you make for your business plan and help you figure out if your farming dreams will actually help you meet these goals.  I date my entries as well as any updates I make to the document.  This helps me to track my changes and see how we’ve grown.

Did you find this helpful?  Let me know!

More information from OSU: https://ohioline.osu.edu/factsheet/anr-52

Perspectives from a Swiss Farm Stay Guest (+ Plum Jam Recipe!)

Since we are a working farm, our farm stay usually requires three days of advance notice.  However, we received an inquiry on the 23rd from a middle-aged woman from Switzerland named Sabine who is traveling the United States indefinitely and was looking for a place to stay overnight on the 24th en route to Vermont.  Our company had just left and I had already refreshed so it was easy to say yes to her inquiry.

To say I’m glad I did is an understatement!  It was an amazing experience to host someone from Europe who specifically chose to stay with us to see what family farms look like in America.  I gave her a tour of our farm and shortly after she asked if she could extend her stay from one night to two.  She was great company so I accepted.  She was having a very restful time and then extended to a third night, and ths gave us a lot of time to talk about so many topics related to the U.S. in general as well as agriculture (sustainable and otherwise).  Sabine was a retired political journalist and was journaling about the people she met and the topics that mattered to them.

A few things I found interesting and that other small farmers and homesteaders may find very interesting:

  1. I have never been to Europe, but Sabine shared that many people have a kitchen garden and know how to preserve their food whether by storing them in glass jars or by dehydrating.  Sabine’s mother taught her to preserve without the use of refrigeration (I’m thinking of you, all of my dear off-grid homesteaders).  Sabine and her late husband had a home in the Piedmont region of Italy, including a vast amount of grapes, plums, and tomatoes.  She would jar enough tomato sugo to last her and her extended family for the year or longer.  She would make marmalade from any fruits she harvested from her property.  She would also dry many fruits.
  2. The United States is over-regulated (and IMHO on the wrong things).  Specifically, I mean in regards to what we can and cannot sell from our farms.  We made plum preserves together and she asked to purchase some when she left.  She was flabbergasted to hear that while I would love to share it with her as a gift, I was not legally allowed to let her purchase the jam because in New York State there are strict regulations on home-canned goods.  When she asked about purchasing dried tomatoes and apples, she was equally bothered that it was illegal for me to sell any produce that had already been cut or portioned.  I would need to rent a certified, commercial kitchen in order to do this.  She continually commented on how sanitary and professional my canning methods were and how she just didn’t understand why individuals can’t make decisions for themselves about whether or not they trust home-canned or home-dehydrated goods.
  3. People in Europe value farm-fresh goods more than Americans.  (Are you surprised to hear this?  I really wasn’t.)  Most things are purchased through direct marketing from specialists.  Local food is the norm for many people.  For example, your vegetables and fruits come from a farmer, as do many preserves and pickles of any kind (unless you make them yourself).  Meat comes from farmers and butchers.  Fresh bread comes from bakers, many of whom use traditional sourdough methods.  Sabine asked to purchase a half-dozen of eggs and when I charged her $1 she felt like I was selling myself short.  In Switzerland, it is common to pay $3.50 for a half dozen of pastured eggs from a farmer.  I typically charge $3.00 for a full dozen!  I said that I would never be able to sell my eggs for $7/dozen here, and she said that people don’t even think twice where she comes from because they know there is a staggering difference in quality and flavor, not to mention that they value their local economies over large enterprises.

Lastly, she reminded me that our farm is a business and that while it is important to have a giving spirit I won’t have a successful business if I don’t charge what my products deserve.  It can feel uncomfortable to take money from friends and family, but as small farmers, let’s all agree that we are going to stand by what our goods are worth.

Our Fall Egg CSA starts in a week, and I’m so excited and proud that I get to make my living this way.  You should be, too.  Let’s try to work some of that European local food appreciation into our culture!

P.S. Here is my recipe my recipe for jam with any stone fruit (apricots, peaches, plums, apricots, cherries, or a mix).  My very favorite, which I made with Sabine, is made with Italian prune plums that I picked at a nearby orchard.  Use freestone fruits whenever they are available because it greatly reduces prep time!

plum jam

Stone Fruit Preserves (Water Bath Canning Recipe)
About 4 lb whole stone fruit
1/2 c water, reserved from boiling the fruit
Juice of 1 lemon
4 tbsp no sugar pectin
4 1/4 + 1/4 c sugar, separated
1 tsp butter

Begin by bringing a small pot of water to a boil.  Meanwhile, wash the fruit and then use a paring knife to cut a small “x” into the blossom end of each fruit.  When the water has come to a boil, carefully lower the fruit into the pot (in batches, depending on the size of your pot) and boil for one one minute.  Cool the fruit until you can touch it.

While the fruit is cooling, combine the 1/2 cup of reserved cooking water with the juice of one lemon.  In a medium bowl, measure out the 4 1/4 cups of sugar.  In a small bowl, combine the additional 1/4 cup of sugar with the 4 tbsp (1/4 cup) of pectin.  Combining a small amount of sugar with the pectin helps to prevent the pectin from clumping. Finally, measure an approximate tsp of butter and set aside.  This small amount of butter will reduce foam.

Prepare the fruit by peeling, removing stones, and chopping to about 1/2″ square in size.  Place the prepared fruit into a heavy bottomed vessel at least 5 quarts in size, such as an enameled cast iron dutch oven.  Coat with the water and lemon juice.  Bring to a boil, reduce to a simmer, and cook with the lid slightly ajar for about 10 minutes or until the fruit is completely cooked.  You may choose to use an immersion blender for very smooth preserves (this will make more foam that you should skim off), but I prefer to simply mash the cooked fruit with a potato masher to leave some small chunks.  One the mixture is at your preferred consistency, stir in the 4 1/4 cups of sugar and the butter.  Bring to a boil, stirring constantly.  Once it reaches a boil, stir in the sugar/pectin mixture and cook for about one minute or until the jam sets at the desired thickness.  Overcooking the pectin can prevent your jam from setting, so I check the thickness by placing a spoonful on a bowl of ice in the refrigerator.  This will show you how thick the preserves will be when completely cooled.

Remove from the heat and pour into sterilized jars, leaving 1/4-1/2″ of head space. (See this website on how to sterilize jars.)  I then use a clean butter knife and stir the jam to remove some air, wipe the rim, place a hot lid, and twist a band to finger-tightness; this is how my mother taught me, but I’m sure there are other methods out there.  Process in a hot water bath: 5 minutes for half- and quarter-pints, 10 minutes for 12-ounce jelly jars and pints.  Remove from the water and cool for 12-24 hours before checking if the jars have sealed.  I like to use the smaller, freezer-safe jars so that any that don’t seal can be popped in the deep freezer in our basement.  I tend to use those jars first to clear that precious freezer space.


Hello, Old Friend.

Okay, I haven’t written in…a year and four months.  Things have been busy with baby girl and the farm, both of them always growing and teaching me new things.  But here I am!  I’m back and I’m going to try to be better about updating this.  We have a blog on our farm’s website but I try to use that more for farm business updates (i.e. recipe ideas for CSA members) rather than my rambling thoughts, farm planning resources, etc.

I thought I’d update this website with some things that have changed since last April.

First of all, our baby girl is going to be two in November!  Where did the time go?  That child certainly keeps me on my toes.  She loves to be outside, especially with her chickens.  Flowers have been one of her favorite things for a long time now, and she loves to smell and pick them.

Last season was a learning experience (what moment isn’t a learning experience on a farm?) with lots of experimenting.  A few major notes:

  • I’ve found that the 30″ rows with 12″ paths has been my preferred system.  I’ve also finally found the right balance of intensive spacing that maximizes my space without sacrificing our yields.  This is intensive enough that we need to build our own harvest cart but we’ve found we still have more than enough space to move out there.
  • We have finalized plans for “Phase 1” for annual vegetable production, which will include seven rotating plots of six 50-foot rows each.
  • Landscape fabric is absolutely essential to our farm’s operation.
  • We’ve picked up way more work with cut flowers in 2018, including our first ever wedding in September, and while this will require us to set up a tax ID we’ve found that there is a lot of financial gain to be had in this area.  We’ve worked some annual flowers into our long term crop rotation plan.
  • I’ve felt comfortable with the actual planning and growing component of farming because of the foundation I was given by my parents, but I’ve spent the past year educating myself on the business end and I have so many things that I want to share on here for new farmers who are ready to start their own operation.
  • We’re learning to embrace our land for what it is, even if it doesn’t have room for acres and acres of annual veggies.  We had a forest stewardship consultation with a county representative from the NYS Department of Environmental Conservation that I can’t wait to tell you all about soon.
  • The orchard has changed a bit.  The original nine – 3 cherry and 6 apple – are doing really well.  The peach and plum from last year didn’t take but we replaced them with two hazelnuts.  We were gifted a graft from an apple tree from a new friend, a second-career farmer who is converting much of the local farmland to organic certified land for biodiverse grain production, that had been started from seed over 50 years ago by the original farmer on his property about a mile from our home.  For my birthday this year, my best friend and her husband gave me a winesap apple tree as well.  We also put in two pear trees and two chestnuts.  Next year, we will be “finishing” (at least finishing this current section of orchard) with two nectarines and an Asian pear.  Another major and exciting note: one of the Cox’s Orange Pippins has our first ever actual apple!  We’re so thrilled.
  • The berry patch has been a major project for 2018.  The three honeyberries from last year are in incredible shape and we are expecting our first fruits next May.  We added two figs (only one has survived), twenty blueberries, and ten elderberries this past spring.  Yesterday, my best friend visited with her husband and mother-in-law.  Her mother-in-law works at a vineyard that grows grapes and berries for resale, and I was surprised and delighted that she brought us five red currants, two aronias, and two more blueberries.  This was an unbelievable gift that I am still stunned by!  Next year, we will add raspberries, blackberries, and five more currants, and I’ll also divide the existing rhubarb to make at least 24 separate plants.  By the time we are done we hope to also include serviceberries, lingonberries, beach plums, and seaberries.
  • We now host farm stay guests, which has given me an opportunity to fulfill my interest in educating people about our traditional lifestyle and seasonal, nutritious eating.

I think that’s a fair update for now.  But I’m really feeling excited to share more detailed updates with you soon.

Good night!

Reflections on The One-Straw Revolution

A fellow farmer and blogger, Jason at EdibleEarthscapes, recently recommended the book The One-Straw Revolution by Masanobu Fukuoka.  Fukuoka’s ideas about natural, “do-nothing” farming and about quality of life align with a lot of our practices, including the use of green manure instead of synthetic fertilizers, the avoidance of all chemicals, and the no-till method for minimal soil disturbance.  While it may not be realistic to implement everything he did, it has caused me to consider what we do here.  Something I love about this field of work is that you never know it all.  There’s always something else out there to explore.  (And as with everything in life, take what you want and leave the rest.)

Early in the book, regarding quality of life, he writes that farmers in Japan once spent the off-season writing haikus, but that people don’t make time for this anymore.  When I was a music teacher and performing musician, I worked SO much. I would be out the door before the sun was up and would get home well after the sun went down.  We lived in a city.  Sometimes I miss our city apartment, and sometimes I miss the noise. But more often than the nostalgia, I feel gratitude for our lifestyle on our farm.  With the recent changes in my life, especially leaving the fast-paced “professional” world and becoming a mother, I often have to remind myself to relax, to take quiet moments, to listen to the sounds of nature, to write, to paint, to cook.  I don’t get as many moments like that with a baby in the mix, but I still have them most days.  In our region, being a vegetable grower affords me time each winter to rest and regroup before planning takes hold again.  This past winter has been extra special, as a newborn baby required me to slow down.  There were many quiet moments to feel peace and gratitude once we were settled in together.  When Fukuoka spoke of the haikus it made me want to reconnect with my hobbies of painting and writing poetry. I can’t think of a better way to spend a quiet, snowy winter than snuggling my daughter and reflecting on all we have to be grateful for.  I think we could all use this reminder to find balance in our lives, regardless of our occupation.

Fukuoka’s writing about his orchard caused me to reflect on my identity as a farmer.  My parents were the ones who first taught me that chemicals and food do not mix and are bad for the long term health of the earth, if not people.  Dad keeps pear and cherry trees and has had blueberries and raspberries off and on throughout the years.  Not once has he ever sprayed…yet he gets fantastic harvests each year.  If you look to the soil, like in Fukuoka’s orchards, there is a lot of clover as natural ground cover.  If my parents notice any pests, mainly certain non-native moth caterpillars, they usually pick them off and toss them in a bucket.  Besides in the first few years after they were planted (mid-1980s) the trees have only been pruned when branches die.  These practices, which are very “hands-off”, are much like the ones discussed in The One-Straw Revolution.  The general idea is that we need to let trees (and all plants, for that matter) grow in their natural state.  It’s not that there is literally no work to do but rather that the work you do needs to be purposeful.  I have been thinking of it like nature-guided growing.

Whenever we have company over, when giving them a tour of our farm we are almost always asked what we spray our trees with.  And everyone who asks is shocked to find out that we do not spray our orchard (or anything else).  My husband and I are fascinated that even people who have never grown a plant in their life seem to think it is impossible to grow fruit trees successfully without these types of products.  Clearly this notion is somehow engrained in our society.

When on a walk with a friend the other day, she was lamenting that her in-laws are obsessed with sprays and powders in the vegetable garden, the berry patch, and the orchard.  At the start of the season they apply insecticides; at the first sight of any bug they add more.  And yet each year she has noted that they are in a constant battle with plant disease, at times losing whole crops.  Last year they couldn’t harvest any plums, for instance.  In addition they only utilize synthetic fertilizers.  It irks her that they fail to see that unnatural methods have led them to have much more work to do but with poor results.  And regardless of your thoughts on the use of such chemicals on human health, it is clear that these things have a negative impact on the microscopic life forms in the soil and the ecosystem as a whole.  You have to stop and think, “Why bother?”  It requires more effort and doesn’t work very well in the long-term anyway.

My friend and I compared her in-laws’ set-up with my father’s, and it got us thinking about old orchards we’ve both had the pleasure of stumbling upon.  Growing up, my parents’ property was backed up to a big old family farm.  My parents got to know the Long family over the years of being neighbors.  When my sisters and I were young, as he and his wife retired from growing for profit, Mr. Long used to let my dad take us for walks around their property.  I have fond memories of the day we found a few old apple trees.  Mr. Long told Dad that nobody had cared for these trees since his children were young, but you wouldn’t have known.  They were incredibly productive and had exquisite apples.  My favorite of the apples was supposedly Winesap, which I still love to this day.  It is a romantic childhood memory, but my friend has shared similar experiences on her grandparents’ property in Canada and at her husband’s grandfather’s property in Western New York in more recent years.  These trees, having likely been given a solid, natural foundation years ago, continue to thrive without any interference from human beings.

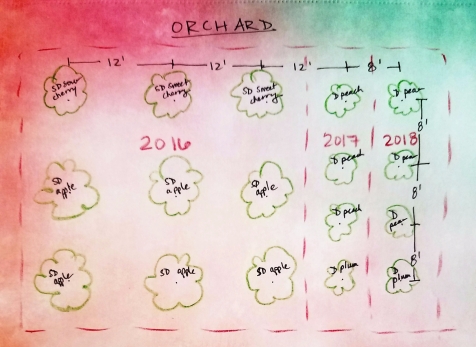
In our orchard, there is already a mix of field onions and perennial grasses on the ground, but I now plan to introduce clover and hairy vetch as well. We have loads of clover in the vegetable area and the soil is especially rich because of it.  I’ve pruned the trees minimally so far, only eliminating branches that would eventually cross or entangle stronger ones.  Although we’re going to be growing in wood-framed beds this year (they’re the future beds for perennials), I’m looking forward to re-expanding our normal 30-inch bed system with cover crops next year.  In the future I’d also love to experiment with a self-seeding vegetable garden like the one Fukuoka speaks of, although it certainly wouldn’t be our main production system.  We’re only in our second season on this property but it seems we may be on the right track for a natural, “do-nothing” microfarm.

Nature has a way of demonstrating the most efficient way of growing things.  Fukuoka isn’t the first person to talk about it, nor will he be the last.  I remember that Eliot Coleman and Barbara Damrosch discussed the forest floor as the ultimate compost system in their show Gardening Naturally.  So again, it’s not about actually doing nothing.  It’s about looking to nature to guide the work you do and making sure you give yourself time to breathe and regroup, too.  I’ll be reminding myself of this often this season.

A Productive Weekend

4 week hens.jpg

I thought I’d start by sharing a photo of our growing hens.  We’re expecting sunny weather in the 60s and 70s this weekend into next week, and so with the girls going into their 5th week of life they will be transitioning to their new home.  They’re mostly feathered out and the brooder is looking tight (even though it technically fits the size requirements and no one is pecking).

Last weekend we had company, my husband’s best friend and his wife, visiting from out of town.  It was the first time they got to meet the baby, and with the extra hands on deck we were able to accomplish a lot on the property while also having plenty of time to catch up.

The first thing the husbands did was work on clearing a good chunk of the brush behind the house.  There were a few dead trees that had been completely overtaken by grapevine and tons of wild raspberry and blackberry (both of which are delicious, don’t get me wrong – but we have over an acre of the stuff and it is incredibly invasive!).  Luckily this is the kind of thing these guys love to do anyway, so they managed to have fun.  The result is that we finally have a clear shot of the beautiful old willow that sits down by the creek, not to mention a gigantic pile of wood that we can either burn or chip.  It’s hard to tell from the photo but the cleared area is about 20’x30’.  The soil is loamy, dark, and full of worm castings – a feast for a farmer’s senses.

When the baby went down for her first nap, us wives got to work on planting the plum tree.  I had already measured and staked locations so this was a pretty quick job.  The peaches, due to a cold snap today, have been pushed back until April 11th.  It would have been nice to get that done while we had two extra adults but we’ll manage just fine.

Although Sunday’s forecast predicted another grey day, we ended up with blue cloudless skies and the guys got an early start on the chicken coop.  My husband found a good deal on a kit for up to 8 chickens that would cost less than building one from scratch, so that’s

coop

Job well done, guys!

what we went with.  While we worked we saw a stoat (a.k.a. short-tailed weasel) in the nearby wood pile.  They are so stinking cute but it reminded me how important it is to keep our animals safe.  With a few adjustments to the coop, I’m pleased with the security.  We built the coop on a frame of 2x4s with 1/2-inch hardware cloth lining the bottom.  We’ll be filling the frame with sand before the girls move in.  Some other mods will include hanging food and water, trays of forage, and a door for the coop.  We do plan to free range (possibly with a mobile run), so for now this is a stationary set-up.  My husband set up the 2×4 frame so we can add wheels in the future if we want to.

The last project for the weekend was finding a location for those two honeyberry plants I mentioned a while back.  My husband and I put the baby in her carrier and walked around the property a few times, but we were stumped for a while.  Finally my husband suggested adding them as edible landscape plants where they’ll receive direct sunlight for at least 6 hours (more in the summer).  As these are shallow-rooted shrubs that grow 4-5 feet tall, they make for a nice foundation plant.  I’m really excited about this addition to our farm because they fruit in May.  This means we will have a fruit crop before strawberries in two or three years!  Their flavor is supposedly like a cross between blueberry and raspberry with notes of elderberry and wine.  Sounds pretty darn good to me.

foundationgarden.jpg

Hubby-of-the-year prepping the honeyberry bed


Seed Swap Stories + Germination Progress

Now that we have some things planted I thought I’d share another template that we use to keep records. This form is for taking notes on seed germination.

So far most of the tomatoes have emerged, but we’re still waiting on most of the tomatillos and all of the peppers and eggplant.  The seeds that have performed the best and germinated fastest – Aunt Ruby’s, Cherokee Purple, Marglobe Supreme, & San Marzano – are all ones that my friend saved from the fruit of extra plant starts I shared with her in 2014.  In 2015 and 2016 she continued to save seeds from the strongest plants of each variety.  She lives about three hours away in Western NY, so our hope is that her seed-saving efforts in a nearby region with the same hardiness zone will have the best results yet.

We swap seeds and extra seedlings with one another every year.  For this season, I shared seeds from Katanya watermelon, Kansas melon, and du 18 Jours radish.  Last year we swapped beans (Good Mother Stallard, Snow Cap, Vaquero), sunflower (Mammoth Grey), and winter squash (Hubbard True Green Improved, Galeux D’Eysines).  It’s a little nerdy but it’s a great excuse to get together and gab about our plans and dreams over a cup of coffee.

Anyway, back to our note-taking.  You certainly don’t need to be so formal but we find it’s helpful.  Each winter we can review this information and, combined with crop yield records and notes about quality/flavor, it helps us decide what varieties to continue to grow and which to replace.

For example, last year we grew two different kinds of eggplant: Beatrice F1 and Fingerling.  I sowed 8 blocks of each, two seeds per block, and only two of the Fingerling blocks germinated compared to seven Beatrice F1.  In this case the Fingerling seeds were ones that my father-in-law purchased from a smaller local seed company and the Beatrice F1 were from a much bigger one.  While I would typically be wary of the company itself I also had almost 100% germination on various kinds of broccoli, turnip, kohlrabi, and radish.  So for now, no more Fingerling eggplant on our farm!

And this year, just from germination thus far I’m feeling excited about the 3rd generation home-saved seeds.  Time will tell if the plant growth and fruit quality match up.

Homestead Updates

1. The month of musicals has finally come to a close and I have my husband back. Phew!  He has had a hard time with his career this month, as he often left just as the baby was getting up to eat and got home after she was put to bed at night.  I waited up for him if he was able to get home before 10:00, and although it’s been tiring I’m glad that I did.  Being a stay-at-home parent to a young baby can be isolating, and if not for our quick chats over a glass of wine each night I’m sure I would have felt more lonely.

He has missed out on so many baby milestones and doesn’t even feel fulfilled by the work he is doing, so the long hours in a suit and tie don’t seem worth it to him anymore. I know plenty of people who think we’re crazy for it but we would do anything to work side by side each day!  It motivates me to work more diligently on our farm.  Maybe someday we can grow our operation enough so he can join in full time.

2. I made a giant batch of pastured pork trotter stock. This stuff is liquid gold!  It is so gelatinous. Maybe that’s not an appetizing word, but it’s the right one. It is so rich, buttery, and satisfying. Tonight for dinner I used it as a base for one of our family favorite meals, build-your-own noodle bowls.  I also froze five more quarts.  We’ve got happy, warm bellies.


3. I got a head start on our stash of baby food since that adventure will be happening in a month or so.  Right now I have apple, Asian pear, sweet potato, parsnip, and carrot, all of which were storage crops purchased in bulk from local farmers.  (Did you know that you can’t give home-canned fruits and vegetables to babies?  I am so thankful for our year-round market so we have access to these products even in the cold months!)  I froze them in ice cube trays, then transferred them to freezer bags.  Each cube is roughly one tablespoon in size.  I can easily use them in soups and smoothies, too!

IMG_20170327_080759_163
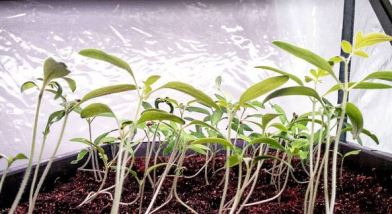
4. Good stuff going on with the nightshades we started a week ago.  So far almost all of the tomatoes have germinated, but we are still waiting on peppers, tomatillos, and eggp
lant. I started more than I originally planned so I can have more seedlings to share with my parents.  Later this week I will share more specific germination notes.

5. The fruit trees have been pruned, and now we are just waiting on the four new additions. They were originally scheduled to arrive yesterday but sudden below-freezing temperatures (14°F) delayed them. Right now it’s looking like April 1st is the day.

A busy weekend but a good one nonetheless.  I hope everyone’s week is off to a great start!

Disappointing Email + Reworking the Orchard

Well, I’m bummed.  I just got an email that the pear trees we placed an order for back in January are no longer available this year and won’t be again until spring 2018.  I know my husband was looking forward to getting the orchard completed this year, somewhat because he’s excited about homegrown fruit but mostly because he wants to be done digging holes in the yard.  But regardless, I took to my notepad and sketched a new plan that would make for easy expansion next year.  Here’s what I’m going with:

orchardplan.jpg

Last year we planted three semi-dwarf cherry (1 each Montmorency, Hardy Giant, Black Tartarian) and six semi-dwarf apple (2 Cox’s Orange Pippin, 1 each Northern Spy, Spitzenburg, Honeycrisp, Golden Delicious).  This year we’re adding three dwarf peach (Elberta Queen, July Elberta, Early White Giant) and one dwarf plum (Stanley Prune).  Next year we’ll finish with three dwarf pear (Beurre Bosc, Bartlett, Anjou) and one more dwarf plum (hopefully Green Gage!).

But here’s the silver lining!  I was $9 away from free shipping, and shipping was going to be $20, so I decided to use those $20 more wisely and pick more plants!  Needless to say we’ll be getting two honeyberry plants with our fruit tree order.  Don’t ask me where they’re going to be planted, though.  I’ll figure it out before they get here this weekend.

Starting Seeds Indoors: Nightshades

Every year we get to the first planting day of the season and I wonder where the time has gone.  Just a few years ago, around this same time, we were planting a hodgepodge of things in plastic cups for our tiny balcony garden.  Now we’re starting our second season at our farm property and we’re gearing up to grow many of our daughter’s first solid foods.  Time flies too fast, but it feels good to be so connected to the changing seasons.

tomatoes20161

If you had the chance to look at our small garden plans for this year, you’ll notice that almost everything can be directly sown in place.  The only exceptions are nightshade crops, like tomatoes and peppers.  In typical seasons we start spring brassicas (like broccoli and kale) indoors, but I’ll just be direct sowing them to save space inside.  We also usually grow eggplant, but because space is limited in the garden and we don’t get comparable yields we’ve decided to purchase these from other farms this year.  We’ll just be growing tomatoes, peppers, and tomatillos for transplanting.

My rule of thumb is to seed roughly an extra 33% of each transplanted.  For example, if I’m planning on planting tomatoes in the field, I’ll start by multiplying six by 1.33.  This equals 7.98, so I’ll seed eight paste tomatoes.  This accounts for any seeds that may not germinate and allows us to choose the best plants.  (I could sell the extra plants, but usually I just bring them to my parents for their “empty nester” garden.  It saves them some hassle, and they get a much wider variety than what they’d find at the nursery!)

So with that in mind, here’s what we’re sowing indoors today:

nightshade amounts.JPG

And I will also note that I usually grow in soil blocks, but because I’m seeding so few transplants I’ve decided to keep the equipment clean, save myself some time, and just grow in plug flats such as these.  I’m keeping the mix the same, which is based on Eliot Coleman’s soil block formula, as it has yielded strong results in the past:

  • 3 quarts compost (I use my father-in-law’s homemade vermicompost)
  • 3 quarts coconut coir
  • 1 quart vermiculite
  • 6 tbsp fertilizer (such as this blend)

I can’t wait to see those little sprouts over the next few weeks.  Hopefully it’ll hold me off until warmer spring weather arrives.

Happy planting!

2017 Planting Schedule + Template

I love to organize, especially when it comes to our farm plans.  Excel is my best friend.  Because our family’s food supply is so reliant on our own growing, it’s crucial that we put a lot of thought and care into our plans not only so we can have a successful growing season but also so we can make future plans based on the year’s experiences.

Now that we have our mini-garden layout finalized I thought I’d share a tool I made for keeping track of the season’s planting schedule.  Here’s an image of this year’s:

2017 planting schedule sample.jpg

I’m a very visual person, so I’ve found it helpful to create a schedule like this (instead of a list or calendar) so I can imagine the whole season from start to finish.  In our area, the last frost date in spring will be around April 30th (highlighted in green) and the first fall frost will be around October 15th (highlighted in red).  As you can see, I’ve chosen Sunday as my planting day of the week because it works best around my husband’s schedule.  I used the formula tool in Excel to make it easy to estimate the maturity date for each crop based on the planting date and days to maturity that I input.  There are separate colors for sowing indoors, direct seeding, and transplanting so I can keep track easily.  And finally, you can see my notes on the right about succession rates, harvest notes, and planting directions.

This tool has worked really well for our family for the past two years, so I thought I’d offer a blank template for anyone who’s interested!  Let me know if you check it out!  And as always, feel free to change it to fit your family’s needs.

Click here to download the Visual Planting Schedule template.